Construction Outlook
Concrete Testing Methods and Performance Outcomes
Concrete performance is defined not only by how strong it becomes, but also by how it behaves in the critical hours and days after placement. From the moment concrete is poured, project outcomes are shaped by two tightly linked factors: setting time, which governs workability and early operations, and compressive strength, which determines when a structure can safely carry load. How these properties are measured, and how quickly reliable data is available, has a direct impact on construction quality, schedule certainty, risk exposure, and cost control. Understanding both traditional and modern testing methods is essential to making informed, timely decisions.
In this article, we examine how concrete setting time and compressive strength are measured, the standards that govern each method across regions, and how newer digital and sensor-based approaches are reshaping decision-making on today’s jobsites.
Why Does Concrete Setting Time Matter?
Before concrete strength becomes a concern, construction teams must first manage time-sensitive workability. This is where concrete setting time plays a critical role. Setting time governs how long concrete remains workable and when it transitions from a plastic material into a rigid mass. While it does not indicate load-bearing capacity, it directly affects finishing quality, joint performance, labor coordination, and early defect risk. In this article, let’s learn about why setting time is essential to avoid surface damage, cracking, and costly rework before strength testing even begins.
What Is Concrete Setting Time?
Concrete setting time is defined by two key milestones:
- Initial Set: the point at which concrete begins to lose plasticity and can no longer be properly finished or reshaped.
- Final Set: the point at which concrete has hardened sufficiently to resist deformation and hold its shape.
Between these two stages lies a narrow operational window where finishing, joint cutting, and curing actions must be executed correctly. Setting time is influenced by mix design, cement chemistry, admixtures, ambient temperature, and placement conditions. Hot weather and accelerators shorten setting time, while cold weather, retarders, or supplementary cementitious materials tend to extend it.
Standard Method for Measuring Setting Time
The primary standard used to measure concrete setting time is the ASTM C403 Penetration Resistance Test..
Method:
A representative mortar sample is taken from fresh concrete and tested periodically. A standardized needle is pressed into the mortar, and the force required to penetrate it is recorded. As the concrete stiffens, penetration resistance increases.
- Initial set is typically identified at approximately 3.5 MPa (500 psi) penetration resistance.
- Final set is typically identified at approximately 27.6 MPa (4,000 psi).
This method provides a quantitative, repeatable way to track setting progression under actual jobsite conditions.
Why Setting Time Data Matters on Projects
Setting time tests support several critical early-stage decisions:
- Finishing Operations: Ensuring finishing begins after bleed water dissipates but before concrete becomes unworkable.
- Joint Cutting: Timing saw cuts to control shrinkage cracking without causing raveling or uncontrolled fractures.
- Crew Coordination: Aligning labor and equipment availability with the concrete’s actual behavior, not assumptions.
- Curing Initiation: Starting curing measures at the right moment to prevent early moisture loss and surface defects.
Interested in learning more about the impact of concrete setting?
Learn more in our blog about concrete setting.
Importance of Compressive Strength Testing
- Structural Safety & Compliance: Ensures concrete reaches design strength (often 20–40 MPa for general structures to meet building codes and guarantee structural integrity. Regular testing verifies the concrete can bear loads without failure.
- Quality Assurance: Confirms that the delivered concrete mix and curing process achieve the required performance. Identifies mix or curing issues early to prevent future durability problems.
- Project Schedule Decisions: Many construction activities (formwork removal, post-tensioning) depend on concrete reaching specific strength thresholds (e.g., ~70–75% of design strength) giatecscientific.com. Timely strength data lets managers proceed at the earliest safe time, avoiding unnecessary delays or premature loading.
- Cost Implications: The testing method affects both direct costs and indirect costs (delays, labor, potential repairs). Choosing efficient testing can optimize schedules and prevent expensive overruns by catching strength issues early. In short, compressive strength testing underpins both safety and efficiency on a project. giatecscientific.com
Traditional Destructive Testing Methods
These involve casting concrete samples and crushing them in a lab to determine strength. They have been industry standards for over a century. giatecscientific.com
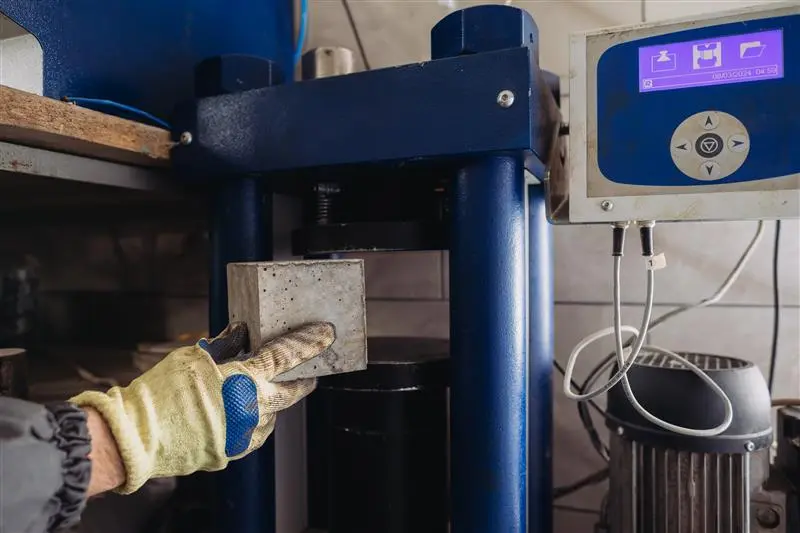
Cylinder Compression Tests (ASTM C39 / CSA A23.2-9C)
Method: Predominant in North America. Concrete is cast into cylindrical molds (typically 150×300 mm or 100×200 mm), cured for specified periods (commonly 28 days for acceptance, with optional 7 or 3-day tests), then crushed in a hydraulic press. Standards like ASTM C39 (testing procedure) and ASTM C31 (sample curing) govern this process.
Pros: Widely accepted by codes in the U.S. and Canada for quality control. Provides a direct, accurate measurement of strength when done properly. The long-established method gives stakeholders confidence; results are repeatable and well-understood.
Cons: Results are delayed—typically a 28-day wait for official strength verification, which can slow construction progress. Even early breaks (e.g., 7-day) only give an indication, not final approval. Indirect costs of waiting (idle time, extended schedules) can be high. Handling and curing must be done carefully: mishandling cylinders, improper curing conditions, or capping issues can yield falsely low results (e.g., micro-cracks from transport). Managing samples and lab tests adds logistical effort. In summary, cylinders are reliable but come with time lags and procedural care requirements.
Cube Compression Tests
Method: Standard in the UK, Europe, and other regions (according to BS EN 12390-3 / old BS 1881). Concrete is poured into 150 mm cubes (often in two layers, well compacted) and cured (often underwater curing). At the test age (commonly 28 days), cubes are crushed, and strength is calculated. Governed by standards like BS EN 12390-3 (modern European standard for cubes).
Pros: Cubes have smooth, parallel faces (molds produce smooth sides), usually eliminating the need for capping or end grinding that cylinders require. This makes testing setup quicker and ensures uniform contact in the machine. Cube tests often yield higher numeric strength than cylinders from the same concrete (commonly ~20% higher) due to geometry. Concrete strength classes in Europe are expressed as e.g. C30/37, meaning 30 MPa cylinder ≈ 37 MPa cube strength. Cubes may better represent in-place strength for elements like slabs or pavements.
Cons: Cubes don’t reflect properly behavior of tall members; their failure mode differs from that of a long column. Thus, design formulas require converting cube strength to an equivalent cylinder strength for structural calculations. Cube testing is region-specific, not typically used or recognized in North American practice, so method must align with local standards on international projects. Like cylinders, cubes are destructive and require curing time and lab testing, so they share the time delay drawback.
Core Drilling Tests
Method: ASTM C42 / BS EN 12504-1 / BS EN 13791 – Used to assess in-situ concrete strength of actual structures, especially if cast specimens show low results or for existing structures A core sample of the hardened concrete is drilled out using a diamond core bit (common core diameters: ~50–100 mm). The core (often length = 2× diameter if possible) is extracted, ends are capped or ground, and it’s crushed in the lab like a cylinder. If cores are shorter than 2:1 length/diameter, correction factors are applied (shorter cores tend to show higher apparent strength).
Pros: Most direct measure of actual in-place strength. Cores capture the concrete as placed and cured in the structure (including real curing temperature, moisture, and any onsite variability), so they reveal the true performance of the structure’s concrete. They are considered the reference for in-situ strength; if there’s doubt from other tests, core results can confirm whether the structure meets requirements. Indispensable for forensic analysis, investigating old structures, or resolving strength controversies.
Cons: Destructive to the structure; each core leaves a hole that must be patched. Removing material can slightly reduce member capacity, so cores are taken sparingly and in non-critical locations. It requires careful planning and often engineer approval. Core testing is relatively expensive and slow (drilling, sample prep, lab crushing, plus structural repair). Core strengths might be lower than lab-cured specimens due to less controlled curing or microcracking from drilling; standards provide ways to interpret core data (e.g., statistical methods in BS EN 13791). Despite drawbacks, cores are the ultimate authority on in-place strength when other methods are inconclusive.
Note: A related method is cast-in-place cylinder molds (ASTM C873), where cylinder molds are embedded in the pour and left to cure with the structure. Later, the concrete “plug” is removed and tested. This exposes the sample to the same environment as the structure (more so than field-cured separate cylinders). However, it still involves lab crushing and leaves a void that must be filled, so it’s not very common in practice. Most projects rely on standard lab-cured cylinders for routine tests and cores for special investigations.
Non-Destructive and Semi-Destructive Testing Methods
These allow assessing concrete strength or quality without (or with minimal) damage. They typically measure indirect properties (surface hardness, wave speed, pull-out force) that correlate to strength. Useful for quick checks and continuous monitoring but usually require correlation to actual strength and are not alone used for official acceptance.
Rebound Hammer (Schmidt Hammer)
Method: ASTM C805 – A spring-loaded hammer that, when pressed against the concrete surface, releases and impacts the concrete. The hammer’s rebound distance is measured on a scale (rebound number from ~10 to 100). Harder (stronger) concrete yields a higher rebound number, as the surface resists the impact more.
Pros: Fast, simple, and completely non-destructive. A handheld device can be used by one person to take many readings in minutes. Provides immediate feedback on surface hardness, making it great for surveying large areas to check uniformity or identify suspect weak spots. It’s inexpensive and requires no lab or sample – truly on-site testing. Ideal as a quick screening tool: for example, to compare curing effectiveness in different areas of a slab or to monitor strength gain trends in the first days after pouring (higher rebound over time indicates curing progress).
Cons: Indirect measure with many influencing factors. The rebound number only reflects the very near-surface concrete (a few millimeters depth). Surface conditions (smoothness, moisture, carbonation, temperature) can skew results significantly. The presence of large aggregate or rebar under the test spot can distort readings. Critically, without a prior calibration for the specific concrete mix, converting rebound numbers to actual strength is unreliable. Even with calibration, accuracy is moderate at best – published studies show correlation coefficients (R²) as low as 0.3–0.7 between rebound and compressive strength for various concretes, meaning a lot of scatters. ASTM C805 warns that rebound results should not be used to accept/reject concrete strength on their own; they are best for comparing relative quality. In practice, a low rebound reading is a red flag to investigate further (maybe take a core), but a single rebound test is not definitive proof of strength. In summary, the rebound hammer is excellent for quick checks and comparing zones of concrete, but it’s not sufficiently precise for formal strength verification.
Penetration Resistance (Windsor Probe)
Method: ASTM C803 – A powder-actuated device fires a small steel probe (pin) into the concrete surface with a standardized force. The depth of penetration of the probe into the concrete is measured after firing. Stronger concrete will resist penetration more (shallower hole), while weaker concrete allows deeper penetration.
Pros: Still relatively quick and simple to perform on site. Because the probe goes slightly below the surface, it can be less sensitive to just surface skin properties (which might be affected by curing or drying) compared to the rebound hammer. Gives an immediate numeric result (depth or exposed length of probe) that correlates with strength. Good for checking near-surface strength development (for instance, to confirm a floor has enough strength to walk on or to prestress). Multiple tests can be done in one area to average out variability.
Cons: It is semi-destructive: each test leaves a small hole and a probe (if not removed) in the concrete. While the damage is minor and can be patched, it’s not completely non-invasive. Like the rebound hammer, the penetration result requires calibration to the specific concrete mix to estimate compressive strength; without that, it’s only useful for relative comparisons. Aggregate size, concrete age, and internal steel can affect results (a large aggregate hit by the probe could give an artificially shallow penetration). Accuracy is generally low-to-moderate; not as widely used as rebound hammers because it’s slightly more cumbersome (uses cartridges like a nail gun, requiring safety precautions). It provides a rough strength estimate at best and is seldom used for official QA/QC decisions, serving more as a specialty test when other options are not available or as a quick field check.
Ultrasonic Pulse Velocity (UPV)
Method: ASTM C597 – Uses sound waves to assess concrete. A pair of transducers is placed on opposite sides of a concrete element (or sometimes on the same surface in a pitch-catch mode). One transducer emits an ultrasonic pulse that travels through the concrete and is received by the other transducer. By measuring the transit time and knowing the path length, the pulse velocity (m/s) through the concrete is calculated. Higher velocities generally indicate denser, more continuous material (which often correlates with higher strength and quality), whereas lower velocities can indicate cracks, voids, or lower quality concrete.
Pros: Fully non-destructive and can evaluate the interior of concrete, not just the surface. Useful for detecting internal flaws like cracking, honeycombing, or voids because those discontinuities slow down the wave. Good for uniformity checks and quality mapping across large structural elements. If calibrated with lab samples, UPV can be used to estimate strength; it often shows a better correlation with compressive strength than surface hardness methods do. Some research shows high correlation (R² ~0.9 under certain conditions) between UPV and strength when concrete mixes are consistent. Great for long-term monitoring of structures (e.g., checking if concrete is deteriorating or cracking over years). No damage is caused and it’s reusable equipment.
Cons: Requires expertise and proper setup. Results can be affected by many factors unrelated to strength: e.g., the presence of reinforcing steel (which transmits sound faster than concrete and can give an overly high velocity), aggregate type, concrete moisture and temperature, and path length geometry. Typically needs access to two faces of a member (direct through-transmission is best for accuracy), which isn’t always practical (for very thick or one-sided elements, there are indirect methods but more complex). It provides an indirect measurement; you need a pre-established velocity-to-strength relationship for the specific concrete, usually derived from lab tests or empirical charts, to translate velocity into a strength estimate. If the actual concrete on site differs from the calibration (different materials or curing environment), the strength estimate might be off. Also, high strength concrete tends to only show incremental increases in UPV, so distinguishing, say, 40 MPa vs 50 MPa by UPV might be difficult. In summary, UPV is best used as a diagnostic tool (find weak zones or internal damage) and as part of a combined assessment of strength. It adds valuable info about internal concrete quality, but by itself it’s not typically used as the sole basis for accepting concrete strength.
Pull-Out Test
Method: ASTM C900 – A semi-destructive test measuring the force required to pull a metal insert out of the concrete, thereby forcing a chunk of concrete (a roughly cone-shaped piece) to be extracted. There are two main approaches: cast-in pullout (inserts are cast into fresh concrete, e.g., the Lok-Test disc) and drilled pullout (CAPO test) where an insert is installed into a drilled hole in hardened concrete. A loading jack pulls the insert until a cone of concrete comes out. The pullout force correlates to compressive strength because stronger concrete will require higher force to fail in this manner.
Pros: Provides a mechanical measure that correlates closely with actual compressive strength of the concrete, typically more reliably than rebound or penetration methods. It tests a volume of concrete and causes a concrete failure (shear cone), so it directly evaluates concrete’s strength in situ. Can be done earlier than 28 days to check if sufficient strength is reached for critical operations (e.g., whether a young column or wall can carry load or forms can be removed). Often used to verify early-age strength gain on site without waiting for lab cures. Only a localized minor damage is done, and the data is obtained immediately on site. Good for spot-checking areas of a structure when one needs more confidence than NDT provides but wants to avoid taking a full core sample.
Cons: Each test does leave a small conical hole that must be patched, so there is slight damage (though usually not structurally significant if done sparingly). Requires specialized equipment and careful execution (alignment of the pull device, proper insertion of the anchor). Calibration is needed for converting pullout force to compressive strength – usually done by having performed the test on lab specimens of known strength for the given concrete mix and insert type. Not as fast as a rebound hammer (each pullout test takes setup time) and not typically used for high-volume testing due to the minor damage and effort. Generally effective up to medium-strength ranges; extremely high-strength concrete might exceed the device’s pull capacity or not form a proper cone. While accurate, it’s often reserved for specific cases (early strength verification, investigating suspect concrete) rather than used on every pour because it’s more invasive than pure NDT.
Combining NDT Methods for Better Accuracy
No single NDT method is foolproof; however, using multiple methods in tandem can improve confidence. For example, rebound hammer plus ultrasonic velocity together: a hard concrete surface with high rebound that also shows high UPV internally is a strong indicator of good concrete quality throughout. Some approaches use algorithms or charts combining rebound and UPV readings to estimate strength with better accuracy than either alone. Early-age concrete might be monitored with rebound (sensitive to surface stiffness gains), while later age strength is cross-checked with UPV (more reliable when concrete is mature). Pullout tests can be used to validate or calibrate other NDT readings on a project. In practice, one might do a quick rebound survey to map variability, then apply UPV or a pullout test on selected spots that look questionable.
Important: Even when using NDT for guidance, most construction specifications still require traditional cylinder or cube tests for formal 28-day strength acceptance. NDT results are often treated as preliminary or supplemental information. For example, when using modern maturity sensors (next section), project teams typically still break a few cylinders at 28 days to formally verify that the in-place concrete reached the required strength as predicted. Combined methods give a comprehensive picture (e.g., sensors for continuous data, rebound/UPV for uniformity, occasional cores for verification), blending speed with assurance.
Not sure which concrete strength testing method is for you?
Check out our comparison guide!
Maturity Method with Embedded Sensors
This is a modern, non-destructive approach providing real-time estimates of in-place concrete strength by accounting for temperature over time. It has gained popularity with the advent of wireless concrete sensors.
- Principle: Concrete strength development depends on both curing time and temperature. The maturity method quantifies the “curing heat” experienced by concrete to predict strength. As per ASTM C1074, a maturity index (either as Temperature-Time Factor via Nurse-Saul method or an Arrhenius-based equivalent age) is calculated by integrating the concrete’s temperature history. In essence, warmer concrete gains strength faster (up to a point), so a high maturity value indicates more progress in curing.
- How It Works: Sensors are placed in the fresh concrete (commonly tied to rebar) at representative locations. These small, durable sensors log the concrete’s temperature at set intervals (e.g., every 15 minutes). The recorded data is used to compute the maturity index continuously. Before the project (or at the start), a calibration curve is established in the lab for that concrete mix: cylinders are cast, cured at different temperatures or durations, and crushed at various ages (1, 3, 7, 28 days, etc.). For each break, the maturity value is calculated and paired with the compressive strength, yielding a strength-versus-maturity graph for the mix. This curve is then programmed into the system. On site, the maturity value from the sensor is automatically converted into an estimated in-place strength using the calibration curve.
Wireless Sensor Systems: Systems like SmartRock® embed both a temperature sensor and a transmitter in the concrete. They often use Bluetooth® or wireless gateways to send data to a mobile app or cloud platform. Project personnel can then view real-time concrete strength readings on a smartphone or computer dashboard for each sensor placed in the structure, such as Giatec 360™. The data updates continuously as the concrete cures. Multiple sensors can be installed in different parts of a large pour (e.g., corners of a slab, center of a mass pour) to monitor strength development throughout.
Pros: Maturity monitoring with embedded sensors turns concrete strength into a real-time project control tool. Instead of waiting for fixed-day cylinder breaks, teams can see how strong the concrete is at any moment and make time-sensitive decisions—like formwork removal, post-tensioning, loading, or opening to traffic—as soon as it is safe. On many projects, that can mean moving ahead in 3-4 days instead of assuming a full week, which directly compresses the schedule and reduces cost.
When the system is properly calibrated, the maturity method can be highly dependable. It often predicts compressive strength within ±10% of lab-tested results for the same mix. Because it tracks the actual in-place curing conditions—including temperature swings that lab-cured cylinders may not capture—it can produce strength estimates that better reflect real field performance. It also reduces human error tied to sample handling and testing logistics.
Another advantage is continuity. Sensors provide a full-strength curve, not just isolated test points. If strength gain slows during cold weather, the team sees it immediately and can respond with insulation or heat before delays cascade. If strength rises faster than expected, schedules can be safely pulled forward. Finally, sensor platforms create a digital record that can be accessed remotely, giving owners, engineers, and inspectors a shared view of progress. This combination of speed, transparency, and early warning reduces surprises and strengthens risk management.
Cons: Maturity monitoring is powerful, but it comes with a few practical requirements. First, it needs mix-specific calibration. That means breaking cylinders at different ages and temperatures at the start of a project to build a strength–maturity curve. If the mix design changes, calibration may need to be repeated. Second, there is often a trust gap. Even though ASTM C1074 supports the method, some owners, inspectors, or engineers may still require traditional cylinders, especially a 28-day break, as confirmation until the team builds confidence and internal procedures.
There are also cost and process considerations. Sensors are typically single-use and may involve platform or subscription fees, so budgets must account for hardware and data access. However, only a few sensors are usually needed per pour, and the schedule savings often justify the investment. Finally, teams must manage the digital workflow: setting up the app, confirming data capture, and monitoring results to avoid rare but preventable gaps in reporting.
Real-World Impact: Many case studies show that maturity monitoring has shaved days or weeks off projects. For example, a contractor might typically wait 7 days to strip forms by rule of thumb; with maturity data, they found some pours could be stripped in 3-4 days safely, compounding into significantly shorter floor cycles. In infrastructure, a road could be opened to traffic based on maturity readings at, say, 3000 psi reached in 2 days, instead of a blanket 1-week wait, getting lanes open sooner. These improvements not only save time and money but also can improve safety (structures aren’t loaded until they truly have sufficient strength, rather than guessing). Maturity has become a key part of the “digital jobsite,” bringing concrete, a traditional material, into the modern era of sensor-driven construction management.
SmartRock Long Range saved 140+ hours on ONE Park Tower.
See how SmartRock Long Range supported Skyrise Engineering on their project!
Comparison of Concrete Compressive Strength Testing Methods
| Method | Accuracy | Practicality | Cost Profile | Best Use Case |
| Laboratory Cylinders / Cubes | High (benchmark) | Moderate – delayed results | Low per test, high indirect cost | Official acceptance, mix validation, calibration baseline |
| Field-Cured Cylinders | Moderate | Moderate – still delayed | Low direct cost, moderate indirect cost | Early-age estimates for timing decisions (limited reliability) |
| Core Tests | Very High (in-situ truth) | Low – destructive and slow | High | Verification, disputes, existing structures |
| Rebound Hammer | Low (absolute strength) | Very High – fast and simple | Very Low | Screening, uniformity checks, trend monitoring |
| Penetration Resistance | Low–Moderate | Moderate – minor damage | Low | Near-surface strength checks, niche use |
| Ultrasonic Pulse Velocity (UPV) | Moderate (with calibration) | Moderate – skill required | Moderate | Internal quality, defect detection, integrity surveys |
| Pull-Out Tests | Fairly High (calibrated) | Fair – localized damage | High per test | Early-age in-place strength verification |
| Maturity Method (Sensors) | High (calibrated) | Very High – real-time | Moderate upfront, low ongoing | Real-time scheduling, fast-track projects |
Understanding “Low Break” and “High Break” in Concrete Strength Testing
Once compressive strength testing begins, quality control teams closely watch the test results; not just to confirm compliance, but to spot early warning signs. In day-to-day construction language, this often shows up as “low breaks” or “high breaks.” They reflect real performance signals that can affect schedule, risk, and cost if misunderstood or ignored.
What Do “Low Break” and “High Break” Mean?
- Low break
A “low break” occurs when a compressive strength test result falls below the specified strength requirement (for example, a 28-day cylinder testing below the design f’c). In practice, this immediately raises concern because it suggests the concrete may not meet structural or contractual requirements.
- High break
A “high break” refers to test results that are significantly above the specified strength. While this may sound positive, consistently high breaks can signal inefficiencies, such as over-designed mixes, excess cement content, or missed opportunities to optimize cost and sustainability.
Neither term appears directly in codes, but both are widely used on jobsites to communicate how test results compare to expectations.
Common Causes Behind Low and High Breaks
- Low breaks may result from:
- Poor curing conditions (cold weather, moisture loss)
- Improper sample handling or testing errors
- Variability in batching, materials, or water content
- Delayed strength gain, rather than true long-term deficiency
- High breaks are often linked to:
- Conservative mix designs with excess cement
- High early-age strength mixes used where not required
- Differences between lab-cured specimens and in-place conditions
How Teams Typically Respond
When a low break occurs, it does not automatically mean the structure is unsafe. Common next steps include:
- Reviewing curing and testing procedures
- Comparing results with field-cured cylinders or maturity data
- Performing additional testing (such as cores or pull-out tests) if needed
High breaks, meanwhile, often trigger internal reviews focused on mix optimization rather than corrective action.
Embracing Modern Solutions for Better Outcomes
Modern, cloud-connected platforms also improve transparency and collaboration. Contractors, engineers, owners, and inspectors can access the same real-time strength data, replacing subjective judgment with objective information. When strength thresholds are clearly met, actions such as formwork removal can proceed without debate, reducing friction and helping prevent disputes.
From a risk management standpoint, continuous monitoring offers an early warning system. Relying solely on 28-day test results can delay the discovery of slow strength development until it is too late to respond. Real-time data allows teams to adjust curing, temperature control, or sequencing before issues escalate.
These tools also deliver measurable efficiency and cost benefits. Real-time strength visibility reduces idle time, shortens formwork cycles, and lowers overhead costs. As confidence in maturity monitoring grows, projects often reduce the number of “just-in-case” cylinders, cutting laboratory costs and material waste.
Finally, smarter timing supports sustainability and competitive advantage. Fewer delays and less overdesign mean more efficient material use and lower embodied carbon. Firms that adopt IoT-based testing signal innovation, reliability, and professionalism—qualities that increasingly influence project outcomes and bid success.
Industry Acceptance and Trends
Modern concrete strength-testing methods are increasingly accepted, supported by standards, field application, and growing technical familiarity across the industry.
- Standards and Codes: Industry acceptance is grounded in formal standards. The maturity method (ASTM C1074) is widely referenced in ACI, CSA, and DOT specifications for early-age decisions such as formwork removal or opening pavements, typically alongside limited traditional testing. Other methods appear in standards as investigative tools, including rebound hammer (ASTM C805), ultrasonic pulse velocity (ASTM C597), and pullout tests (ASTM C900). In Europe, BS EN 13670 encourages maturity-based approaches under engineer oversight, reinforcing the legitimacy of these methods while emphasizing calibration and careful use.
- Real-World Use: Adoption is well established. Contractors use maturity monitoring on high-rise buildings, bridge decks, and paving projects, reporting schedule savings and strong agreement between sensor-predicted strength and laboratory results. Rebound hammers and UPV remain common for condition assessments, while pullout tests serve targeted roles in fast-track or critical structural work.
- Combining Old and New: Best practice is hybrid use. Teams often validate maturity monitoring with parallel cylinder breaks early in a project, then shift toward continuous monitoring while retaining traditional 28-day tests for confirmation.
- Education and Training: Growing acceptance is reinforced by training. Technicians and engineers are increasingly educated on proper implementation, calibration, and interpretation, helping ensure modern methods deliver reliable and efficient results.
Standards recognition, proven field use, and improved training have positioned modern testing methods as practical, trusted tools alongside traditional approaches.
Bottom Line
Concrete testing should support decisions, not delay them. Different methods answer different questions at different stages of a project.
Traditional cylinders and cubes remain essential for compliance and final strength verification, but their delayed results limit their value during active construction. Setting time tests help manage early operations, while modern methods such as maturity monitoring and targeted in-place testing provide real-time insight into actual concrete performance.
The most effective approach is layered: use setting time to control early work, real-time strength data to guide scheduling and loading, and traditional tests to confirm final performance. Applied together, these methods reduce uncertainty, shorten schedules, and improve overall project outcomes.
Make sure your concrete quality control is solid.
SmartRock Long Range is built to weather the toughest conditions in hard-to-reach places, with concrete temperature and strength data visibility up to 1000 ft (300 m).